Introduction
If you know something about public speaking, you're aware that the most effective presentations are those which have more images and less text. As a developer of applications that auto-generate slide decks, this is even more critical as you must ensure that your code creates the most compelling presentations possible for your users.This means that any text featured in those slide decks must be more impactful. To that end, it's important you know how to format any text you do have. That's the exact subject of today's post, showing you how to format text in a variety of ways using Python and the Google Slides API.
The API is fairly new, so if you're unfamiliar with it, check out the launch post and take a peek at the API overview page to acclimate yourself to it first. You can also read related posts (and videos) explaining how to replace text & images with the API or how to generate slides from spreadsheet data. If you're ready-to-go, let's move on!
Using the Google Slides API
The demo script requires creating a new slide deck so you need the read-write scope for Slides:'https://www.googleapis.com/auth/presentations'— Read-write access to Slides and Slides presentation properties
SLIDES variable.Create deck & set up new slide for text formatting
A new slide deck can be created withSLIDES.presentations().create()—or alternatively with the Google Drive API which we won't do here. We'll name it, "Slides text formatting DEMO" and save its ID along with the IDs of the title and subtitle textboxes on the auto-created title slide:DATA = {'title': 'Slides text formatting DEMO'}
rsp = SLIDES.presentations().create(body=DATA).execute()
deckID = rsp['presentationId']
titleSlide = rsp['slides'][0]
titleID = titleSlide['pageElements'][0]['objectId']
subtitleID = titleSlide['pageElements'][1]['objectId']
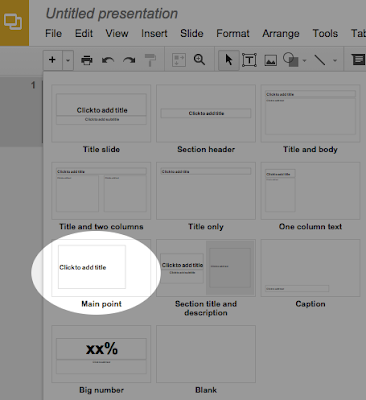
The title slide only has two elements on it, the title and subtitle textboxes, returned in that order, hence why we grab them at indexes 0 and 1 respectively. Now that we have a deck, let's add a slide that has a single (largish) textbox. The slide layout with that characteristic that works best for our demo is the "main point" template:
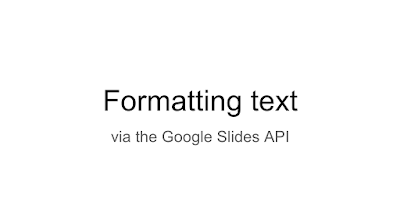
While we're at it, let's also add the title & subtitle on the title slide. Here's the snippet that builds and executes all three requests:
print('** Create "main point" layout slide & add titles')
reqs = [
{'createSlide':
{'slideLayoutReference': {'predefinedLayout': 'MAIN_POINT'}}},
{'insertText':
{'objectId': titleID, 'text': 'Formatting text'}},
{'insertText':
{'objectId': subtitleID, 'text': 'via the Google Slides API'}},
]
rsp = SLIDES.presentations().batchUpdate(body={'requests': reqs},
presentationId=deckID).execute().get('replies')
slideID = rsp[0]['createSlide']['objectId']
The requests are sent in the order you see above, and responses come back in the same order. We don't care much about the 'insertText' directives, but we do want to get the ID of the newly-created slide. In the array of 3 returned responses, that slideID comes first.Why do we need the slide ID? Well, since we're going to be using the one textbox on that slide, the only way to get the ID of that textbox is by doing a
presentations().pages().get() call to fetch all the objects on that slide. Since there's only one "page element," the textbox in question, we make that call and save the first (and only) object's ID:print('** Fetch "main point" slide title (textbox) ID')
rsp = SLIDES.presentations().pages().get(presentationId=deckID,
pageObjectId=slideID).execute().get('pageElements')
textboxID = rsp[0]['objectId']
Armed with the textbox ID, we're ready to add our text and format it!
Formatting text
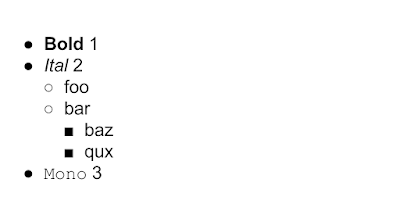
The last part of the script starts by inserting seven (short) paragraphs of text—then format different parts of that text (in a variety of ways). Take a look here, then we'll discuss below:reqs = [
# add 6 paragraphs
{'insertText': {
'text': 'Bold 1\nItal 2\n\tfoo\n\tbar\n\t\tbaz\n\t\tqux\nMono 3',
'objectId': textboxID,
}},
# shrink text from 48pt ("main point" textbox default) to 32pt
{'updateTextStyle': {
'objectId': textboxID,
'style': {'fontSize': {'magnitude': 32, 'unit': 'PT'}},
'textRange': {'type': 'ALL'},
'fields': 'fontSize',
}},
# change word 1 in para 1 ("Bold") to bold
{'updateTextStyle': {
'objectId': textboxID,
'style': {'bold': True},
'textRange': {'type': 'FIXED_RANGE', 'startIndex': 0, 'endIndex': 4},
'fields': 'bold',
}},
# change word 1 in para 2 ("Ital") to italics
{'updateTextStyle': {
'objectId': textboxID,
'style': {'italic': True},
'textRange': {'type': 'FIXED_RANGE', 'startIndex': 7, 'endIndex': 11},
'fields': 'italic'
}},
# change word 1 in para 7 ("Mono") to Courier New
{'updateTextStyle': {
'objectId': textboxID,
'style': {'fontFamily': 'Courier New'},
'textRange': {'type': 'FIXED_RANGE', 'startIndex': 36, 'endIndex': 40},
'fields': 'fontFamily'
}},
# bulletize everything
{'createParagraphBullets': {
'objectId': textboxID,
'textRange': {'type': 'ALL'},
}},
]
After the text is inserted, the first operation this code performs is to change the font size of all the text inserted ('ALL' means to format the entire text range) to 32 pt. The main point layout specifies a default font size of 48 pt, so this request shrinks the text so that everything fits and doesn't wrap. The 'fields' parameter specifies that only the 'fontSize' attribute is affected by this command, meaning leave others such as the font type, color, etc., alone.The next request bolds the first word of the first paragraph. Instead of 'ALL', the exact range for the first word is given. (NOTE: the end index is excluded from the range, so that's why it must be 4 instead of 3, or you're going to lose one character.) In this case, it's the "Bold" word from the first paragraph, "Bold 1". Again, 'fields' is present to indicate that only the font size should be affected by this request while everything else is left alone. The next directive is nearly identical except for italicizing the first word ("Ital") of the second paragraph ("Ital 2").
After this we have a text style request to alter the font of the first word ("Mono") in the last paragraph ("Mono 3") to Courier New. The only other difference is that 'fields' is now 'fontFamily' instead of a flag. Finally, bulletize all paragraphs. Another call to
SLIDES.presentations().batchUpdate() and we're done.Conclusion
If you run the script, you should get output that looks something like this, with eachprint() representing execution of key parts of the application:$ python3 slides_format_text.py ** Create new slide deck ** Create "main point" layout slide & add titles ** Fetch "main point" slide title (textbox) ID ** Insert text & perform various formatting operations DONEWhen the script has completed, you should have a new presentation with these slides:


Below is the entire script for your convenience which runs on both Python 2 and Python 3 (unmodified!)—by using, copying, and/or modifying this code or any other piece of source from this blog, you implicitly agree to its Apache2 license:
from __future__ import print_function
from apiclient import discovery
from httplib2 import Http
from oauth2client import file, client, tools
SCOPES = 'https://www.googleapis.com/auth/presentations',
store = file.Storage('storage.json')
creds = store.get()
if not creds or creds.invalid:
flow = client.flow_from_clientsecrets('client_secret.json', SCOPES)
creds = tools.run_flow(flow, store)
SLIDES = discovery.build('slides', 'v1', http=creds.authorize(Http()))
print('** Create new slide deck')
DATA = {'title': 'Slides text formatting DEMO'}
rsp = SLIDES.presentations().create(body=DATA).execute()
deckID = rsp['presentationId']
titleSlide = rsp['slides'][0]
titleID = titleSlide['pageElements'][0]['objectId']
subtitleID = titleSlide['pageElements'][1]['objectId']
print('** Create "main point" layout slide & add titles')
reqs = [
  {'createSlide':
     {'slideLayoutReference': {'predefinedLayout': 'MAIN_POINT'}}},
  {'insertText':
     {'objectId': titleID, 'text': 'Formatting text'}},
  {'insertText':
     {'objectId': subtitleID, 'text': 'via the Google Slides API'}},
]
rsp = SLIDES.presentations().batchUpdate(body={'requests': reqs},
        presentationId=deckID).execute().get('replies')
slideID = rsp[0]['createSlide']['objectId']
print('** Fetch "main point" slide title (textbox) ID')
rsp = SLIDES.presentations().pages().get(presentationId=deckID,
        pageObjectId=slideID).execute().get('pageElements')
textboxID = rsp[0]['objectId']
print('** Insert text & perform various formatting operations')
reqs = [
# add 7 paragraphs
{'insertText': {
'text': 'Bold 1\nItal 2\n\tfoo\n\tbar\n\t\tbaz\n\t\tqux\nMono 3',
'objectId': textboxID,
}},
# shrink text from 48pt ("main point" textbox default) to 32pt
{'updateTextStyle': {
'objectId': textboxID,
'style': {'fontSize': {'magnitude': 32, 'unit': 'PT'}},
'textRange': {'type': 'ALL'},
'fields': 'fontSize',
}},
# change word 1 in para 1 ("Bold") to bold
{'updateTextStyle': {
'objectId': textboxID,
'style': {'bold': True},
'textRange': {'type': 'FIXED_RANGE', 'startIndex': 0, 'endIndex': 4},
'fields': 'bold',
}},
# change word 1 in para 2 ("Ital") to italics
{'updateTextStyle': {
'objectId': textboxID,
'style': {'italic': True},
'textRange': {'type': 'FIXED_RANGE', 'startIndex': 7, 'endIndex': 11},
'fields': 'italic'
}},
# change word 1 in para 6 ("Mono") to Courier New
{'updateTextStyle': {
'objectId': textboxID,
'style': {'fontFamily': 'Courier New'},
'textRange': {'type': 'FIXED_RANGE', 'startIndex': 36, 'endIndex': 40},
'fields': 'fontFamily'
}},
# bulletize everything
{'createParagraphBullets': {
'objectId': textboxID,
'textRange': {'type': 'ALL'},
}},
]
SLIDES.presentations().batchUpdate(body={'requests': reqs},
presentationId=deckID).execute()
print('DONE')
As with our other code samples, you can now customize it to learn more about the API, integrate into other apps for your own needs, for a mobile frontend, sysadmin script, or a server-side backend!

